Using The Cash Register
Last updated May 15, 2025
Knowing how to efficiently use your cash register is incredibly important and the more you use it, the better you'll get at it. Here we will cover the basics, but questions may come up as you get started. Please don't hesitate to contact us at (917) 633-9543, or by using the chat feature on the lower right corner of your sale screen.
Logging in
This article assumes your original setup has been completed and you are logging in as a cashier.
When you turn on the register, you should see the following:
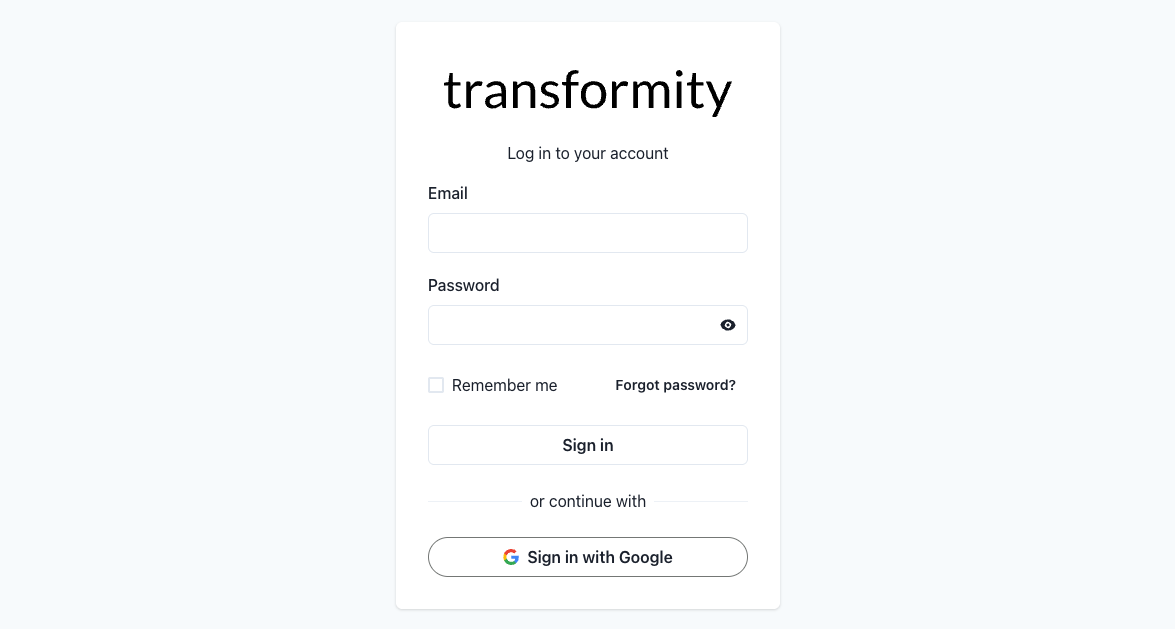
Just enter your username (email created for you by store administrator) and password. This will lead you into this screen:
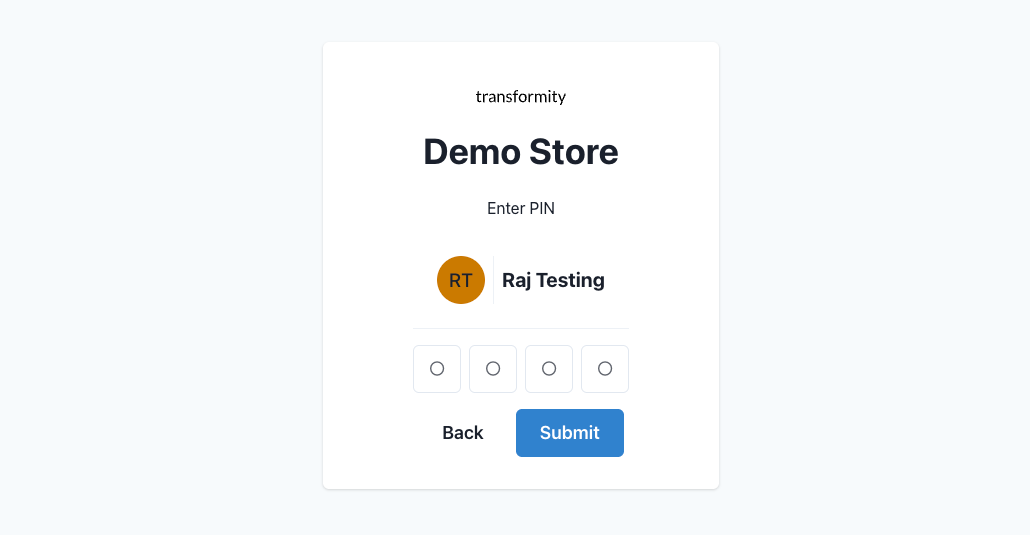
Enter your pin and click "Submit."
Upper Buttons/Bars/Shortcuts

Main Menu: This button opens up a full list of options. Some of these options are accessible based on your role's permissions. Talk to your admin if you have questions.

Manager Override: This button lets a manger join a session to take actions that may be outside a cashier's permissions. Clicking this lets them enter their pin and do what's needed. Manager should log out afterwards and cashier will need to log back in. If the override happens in the middle of a transaction, the manager will be automatically logged out after the transaction is completed, and cashier will be able to log back in.
Cash Drawer: This button opens your cash drawer. This button will only be enabled if the store manager/admin has authorized its use.
Search: This button takes you to a search window where you can look for items by name, barcode, SKU, Departments, etc.


Search for an item Bar: This bar lets you look for an item and select it/add it to the order without leaving the sale screen
Sales Channel Shortcut: Lets you switch to a different sales channel (like Doordash or UberEats).

User Switch: Clicking the lock logs you out so that a new user can log in. The circle next to the lock indicates the initials of the current cashier.
Taking Customers
We will explain each part below, but below is a short video giving you a tour of the sale screen.
Video Tour
Scanning items
When you scan an item, it will be listed in the larger blank box of the screen, under the following heading:

This heading helps you quickly identify the different properties of an item.
- Name: Includes brand, flavor, size, etc
- Price: Shows what the store is charging for the item, before taxes
- Quantity: Shows how many units of that item a customer is buying
- Discount: Shows any discounts (automatically or manually added)
- Sub-Total: Shows the price post-discount (if any) and before taxes and fees
- Fees: Shows bottle deposits or environmental fees (state based)
- Tax: Shows sales tax (product and state based)
- Item Total: Shows the final price for the line item
When scanning, you can change the quantity by scanning an item multiple times,

by changing the number of items directly in the price column (by typing a number or by using the -/+ symbols),
or by selecting multiplier button in the lower part of the sales box (note that the multiplier must be pressed before scanning an item).
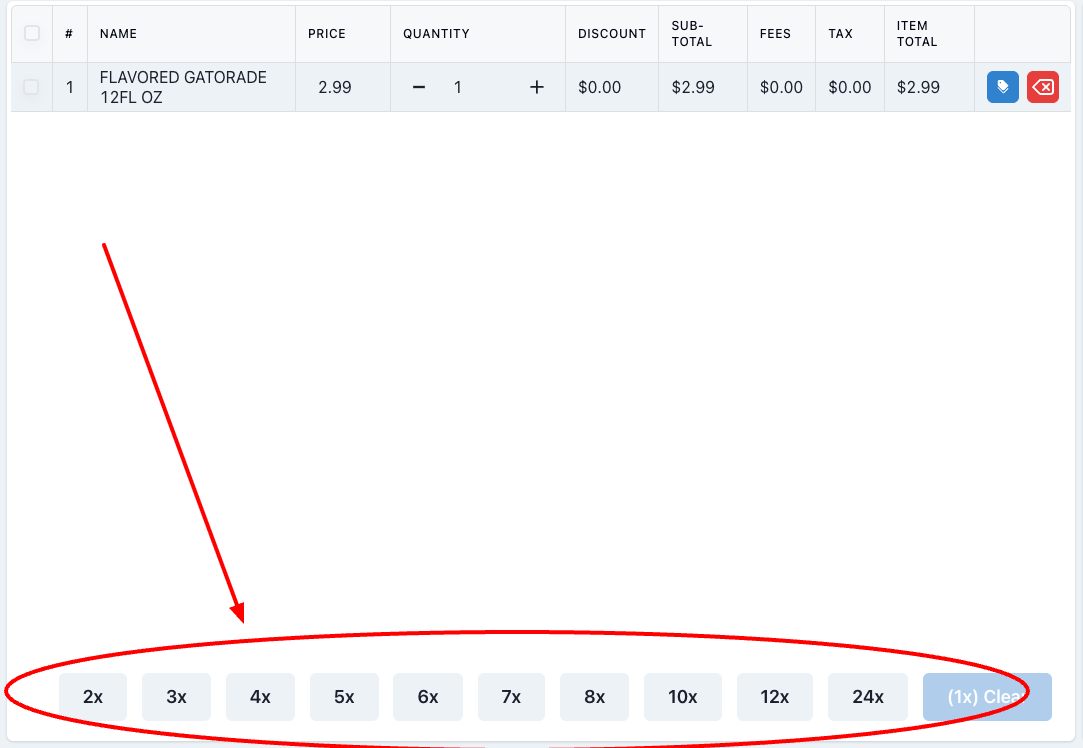
*Please keep in mind that if you press the wrong multiplier and want to change it, you must click the "Clear" blue button to the right of the multipliers. If you just click a different multiplier instead, you will be adding the multipliers. For instance, if you click 6x but change your mind and click 12x, you are now multiplying the item for 18. So you would need to clear the 6x first and then click 12x.

When items cannot be scanned
Searching for an Item: You may need to enter an item manually. If your role has the permissions needed, you can search items by name typing in the "Search for an item" bar at the top.

Adding an item not in the system: If an item cannot be find by scanning or by manually searching for it, you may ring in a new item. This will require authorization form your manager/admin.
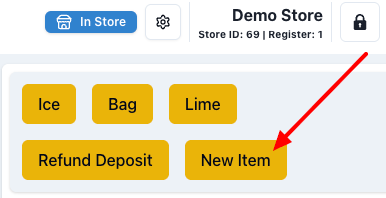
To do this, simply click on the "New Item" yellow button (part of the Yellow Hot Keys on the right).
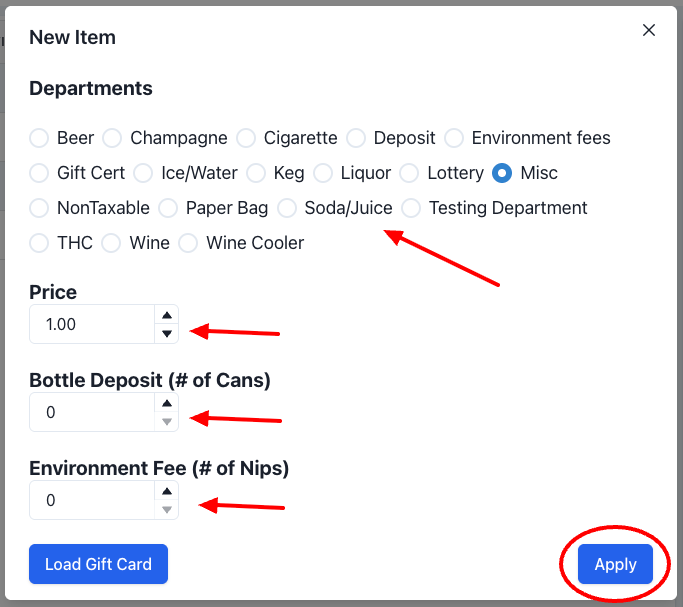
This will open up a pop up window where you can select the type of item (lottery, miscellaneous, soda, etc), the price, and whether it has any bottle deposit or environmental fees.
Once you are ready, you would click "Apply"
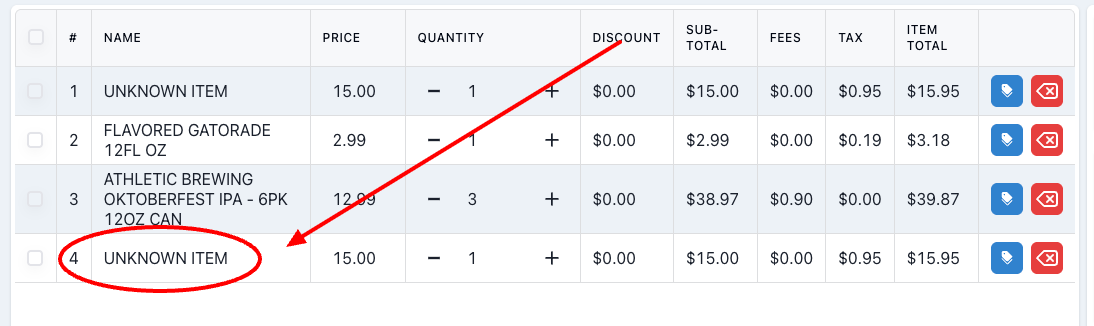
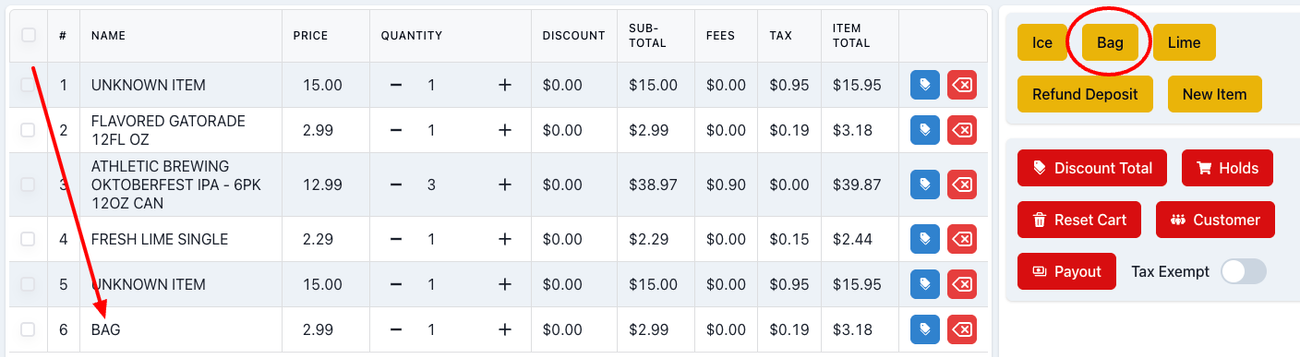
The item will appear as "UNKNOWN ITEM" in your sale screen.
Using Yellow Hot Keys
To the right of your screen you have a number of yellow hot keys that help you quickly add items to the order.
Hot keys are customizable by request. Just sent us a message if you would like to add new ones to your sale screen.
Single-item hot keys: You simply click on it, and the item will be automatically added to the order. This means there is only one variant of such item (note that you can always add more variants).
Multi-item hot keys: When you click on the hot key, you will immediately see a pop-up window.

This pop-up window will prompt you to choose a variant for the item selected.

You simply have to choose the one you want and it will be automatically added to the order.

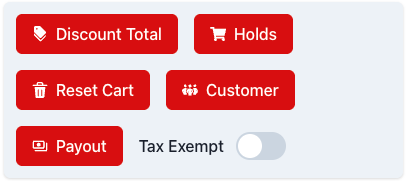
Using Red Action Keys
Right under the yellow hot keys, you'll find an area with red action keys. This keys don't add items, they trigger actions.

Discount Total: This opens a pop-up window where you can enter a percentage or a dollar amount discount to add to an order. Just select "Percent" or "Amount," type the desired number or use the -/+ symbols, and when everything looks good, click "Apply." The discount will be added to the entire order. *
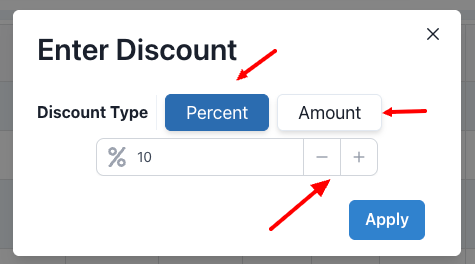
*If you want to add a discount to only specific items in the order, do not use red hot key, use the blue discount tag next to each item on the list:

If you click on the blue tag, the same window to enter a discount will open, but it will only affect the item selected.

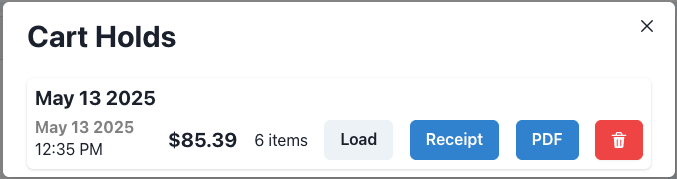
Holds: This key allows you to place a hold on an order and save it for later. A pop up window will open to let you name the cart you are placing on hold. If you do not add a name, the default name will be the date:
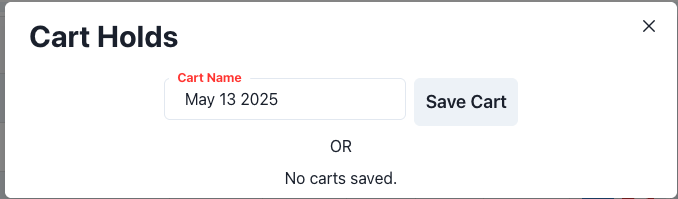
Once you click on "Save Cart" the window will disappear and your screen will be clear and ready for a different transaction. When you are ready to continue ringing the saved cart, just click on "Holds." This will open a pop-up that will show you a list of all the carts you have placed on hold. Just click on "Load" next to the one you want.
This will let you continue from where you left off.*
*This is helpful in many situations, for instance, if you have a line and the customer you're helping has to go back to get something they forgot. Instead of having to wait for them, you can place their cart on hold, ring the next person up, and reopen their cart when they are ready.

Reset Cart: This key allows you rest your cart, clearing the sale screen so you can start over.
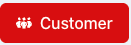
Customer: This key will open a pop-up window with a list of your registered customers. There you can search for them and select them so that they can get credit for the purchase. If you want to unselect them, just click on the red removal icon next to their name.
*Click here to read more about adding and editing customers.

Payout: This key will open a pop-up window with options to close your drawer and put cash in or out of your drawer. This key is reserved for managers and admins.

Tax Exempt Toggle: Although this is a toggle and not an "action key," it belongs to our action keys category because just toggling it triggers the order to be tax exempt. You may need this when customers or organizations who can present proof of tax exemption visit your store.
Deleting Items From The Order
If you need to delete items from the order, you can select the red backspace button next to each item:


Or you can use the Reset Cart button, explained in the previous section, to delete every item from the order.
Checking ID
If you have a Honeywell 2D scanner, you can click on the "Verify ID button" to scan someone's ID for age verification.

This button is on the left lower corner of the screen and has a "Legal Age" display next to it that updates every day.
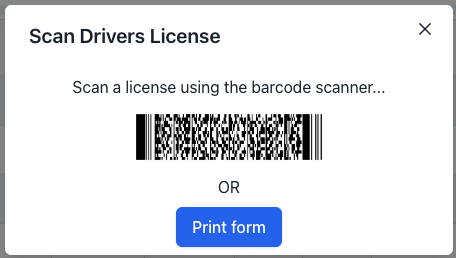
When you click on "Verify ID," a pop-up window will open with an example of the barcode you should scan on the ID and with an option to quickly print an age verification form a customer can sign.
This also activates the function. Just use your scanner to scan the ID.
Please note that this function verifies age, but it does not check for fake IDs.
Charging For The Order

To charge for the order, you will click on the "Pay" button (lower right), which will include the final total.
Once you click it, a pop-up window with payment options will open:
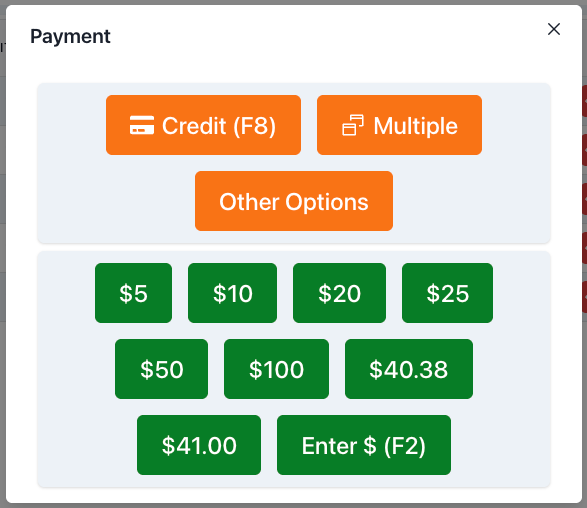

Credit: Selecting credit will activate your credit card reader so your customers can tap, swipe, or insert their credit card.

Multiple: Selecting multiple will let you use more than one form of payment, including separate credit cards, and any combination of cash, credit, check, gift card, rewards points, or house account.
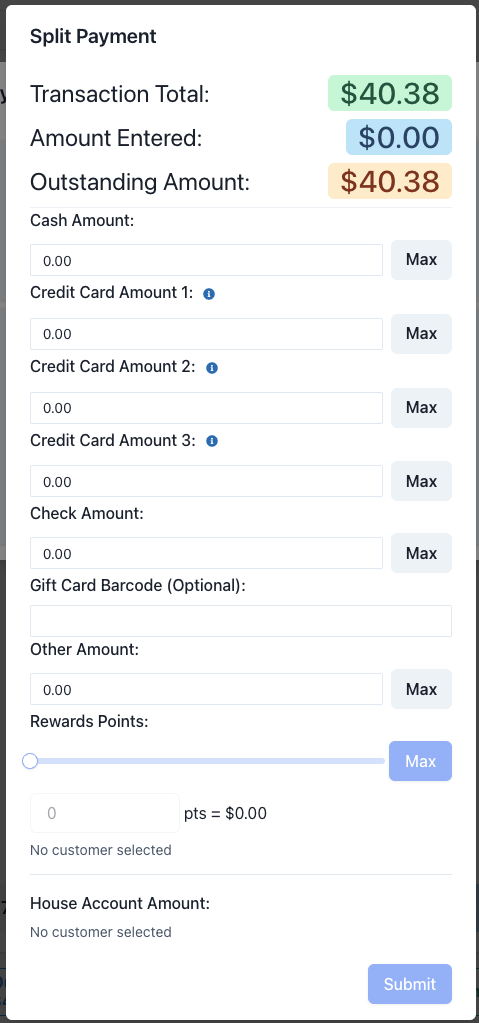
You will see this window open up, showing you the grand total, and allowing you to allocate amounts to each different payment type you would like to use.
The "Max" button next to each payment type amount field, allows you to automatically add what is left. For instance, if you do:
Check Amount: $14.00 and
Cash Amount: $13.00
And you want to charge the rest on a credit card without having to add and subtract, just click the "Max" button next to the "Cash Amount" field and it will automatically fill:
Credit Card: $13.38

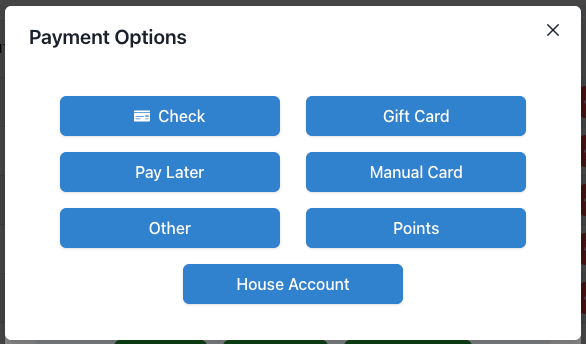
Other Options: Selecting this opens another window that lets you select the type of payment (other than credit card by reader) you want to use:
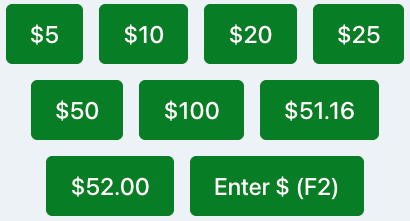
Cash: If your customers want to pay with only cash, you can use the green keys. They represent the bills your customers are using to pay and wether they are giving you exact change.
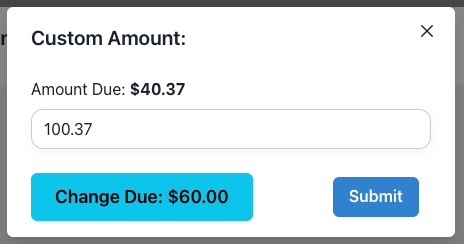
If you want to type the amount a customer has given you, you can click on "Enter $" and a popup window will appear with the option to enter the amount a customer is giving you:
This is great to calculate change due.
Once you click "Submit," you will see the change due one more time (it will show $0.00 if you were paid with exact change) and you will be finished with the transaction once you click "Done."